This blog carries on from my last blog which showed how to create the Smart Assist bot and the configurations required in Azure. This blog will show what should be configured in Dynamics 365.
To complete the setup, it is important to have bot application id and the app registration application id. Information on how to retrieve both ids are in part 1.
To complete the configuration of the bot, we need to create a smart assist bot user in Dynamics 365 with the necessary permissions and associate the user to the work streams or channels which will use Smart Assist.
Create Application User
To create a user in Dynamics 365, you would normally be advised to do this in the Office 365 admin centre. However, application users must still be created in the classic user interface.
- Browse to advanced settings which can be found as per the below image.
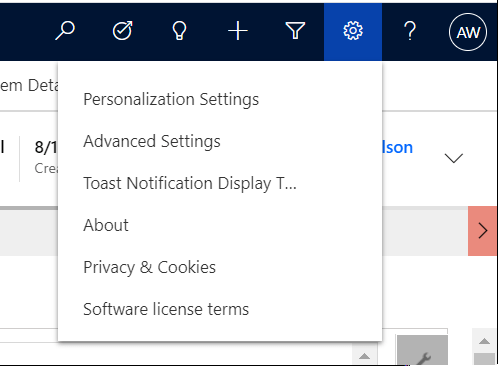
- Browse to Settings – Security – Users
- Change the view to Application Users
- Create a new user and ensure the form type selected is Application User
- Ensure the application id is populated with the application id taken from the app registration created previously.
- Populate the mandatory fields: name, full name and email address should be populated. However, the values populated here have no bearing on the smart assist bot.
- Save the record and select “bot application user” from the user type field.
- Populate the bot application id with the application id taken from the bot.
- Save the record and assign the Omni Channel Agent role to the newly created user.
Add Bot user to each channel
Each channel (with the exception of the voice channel) can be configured to use the Smart Assist feature. The user must be associated to each applicable channel.
- Browse to the Omni Channel Administration Hub
- Click on Work Streams in the Work Distribution Management section
- Open a work stream record
- On the smart assist tab, add the created smart assist user.
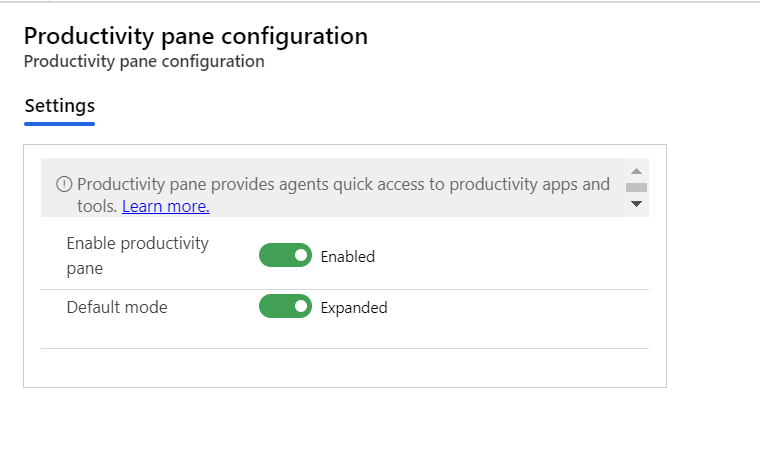
Set up the Productivity Pane
The productivity pane must be enabled to allow the adaptive cards sent by the smart assist bot to be displayed to the agent.
- Click on Productivity pane in the Agent Experience section.
- Enable the productivity pane.
Now you should be all set up! Enjoy!
